Setting Image area user interaction optionsTopic number: 1425412885655
You can set Image area user interactions options such as multiscale window leveling, series navigation methods, mouse cursor directions, and window center and width directions.
To set Image area user interaction options
- Select .
- In the Options dialog, click Images.

- Switch to the Interactions tab.
- Select the checkboxes of the modality types to use when multiscale window leveling is enabled.
- Enter the value of the maximum zoom-out size.
- To hide the mouse pointer while working in the viewport, select the Hide mouse cursor during viewport interactions checkbox.
- To enable automatic navigation linking, select the Activate Automatic navigation linking checkbox.
It is disabled by default.
- To configure the action when double-clicking the study header in the
Clinical sidebar, select one of the following options from the list:
- Display/compare images
- Display images in Text area
- Display study information
- Do nothing
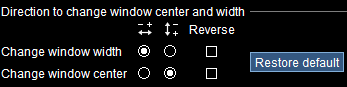
- Configure the direction of the window center and width by selecting
one of the following options:
- From the Save new options for list, select
User, Desktop
profile, or This session only.
User is the default; it sets the options for this and future sessions. Desktop profile, if available, set the options for all users of that desktop profile, except where overridden by user options.
- Click Save or Save & close.
Required permissions: Can change options for desktop profile and user level or Can change options for themselves only. (For more on permissions, see Security roles: Concepts.)