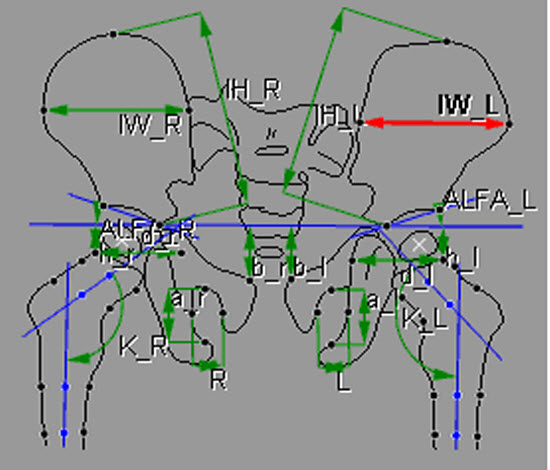
Performing Pelvis Schmid measurementsTopic number: 1425412510882
The markup sequence for a Pelvis Schmid measurement consists of a chain of tools. Completing one step automatically activates the tool required for the next step of the sequence.
In the Image area top toolbar, click the arrow next to the ruler to open
the markup list and select Pelvis Schmid. ![]()
 | Tip: To pan and zoom the image while the measurement tool is active, press Space and drag the image to pan or use the mouse wheel to zoom in and out. |
 | Note: The described markup of a given step is displayed in red in the figures. The extended line is a two-point-specified line where the line is painted beyond the given points. |
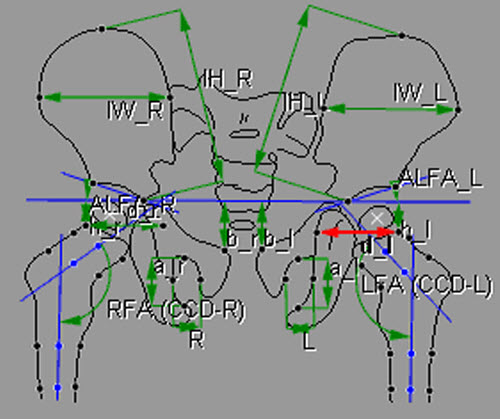
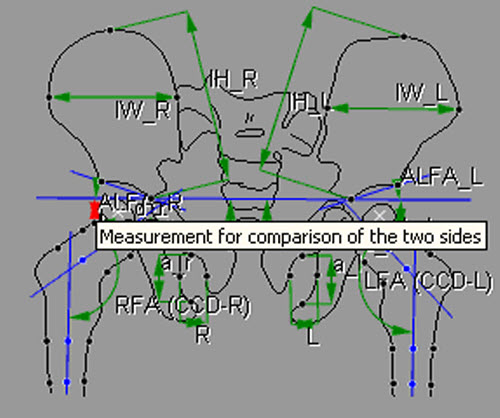
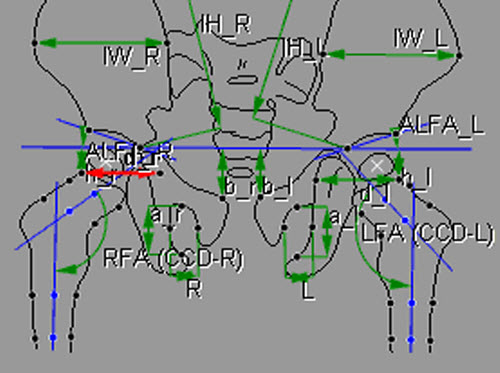
- Hilgenreiner’s horizontal:
Extended line connecting the most caudomedial point on the
ilium on both sides. Interaction: Click 1, Click 2.
Result: Extended line between handle 1 and 2 (Hilgenreiner’s line).

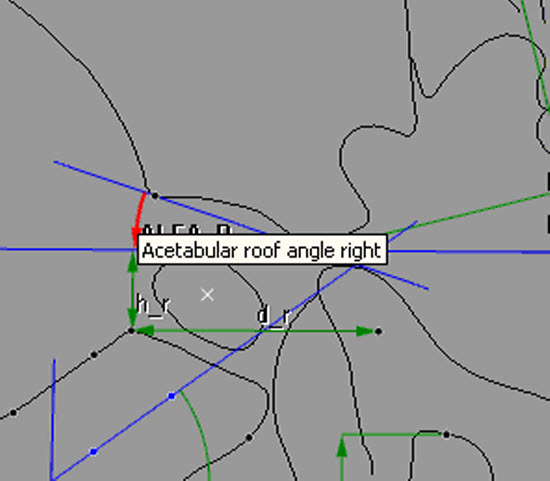
- Right acetabular roof line:
Extended line connecting the most craniolateral point of the
bony acetabulum and its most caudomedial point on the ilium. Interaction: Click 3. Result: Extended line between handle 3 and the right handle
of Hilgenreiner’s line.
- Acetabular roof angle right:
Angle enclosed by the right acetabular roof line and the Hilgenreiner’s horizontal. (This
angle is painted automatically after finishing step 2.) Result: Label name: ARA-R.
- Left acetabular roof line:
Extended line connecting the most craniolateral point of the
bony acetabulum and its most caudomedial point on the ilium. Interaction: Click 4. Result: Extended line between handle 4 and the left handle
of Hilgenreiner’s line.
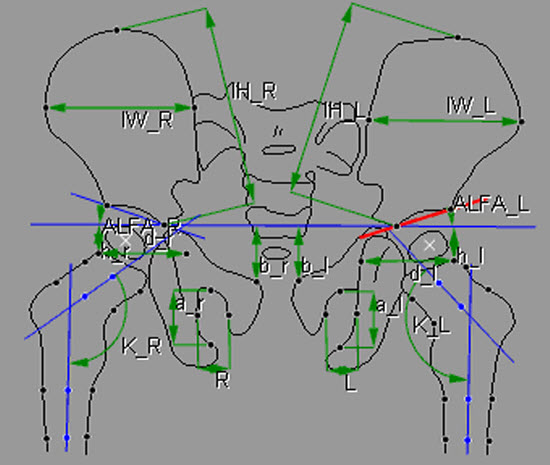
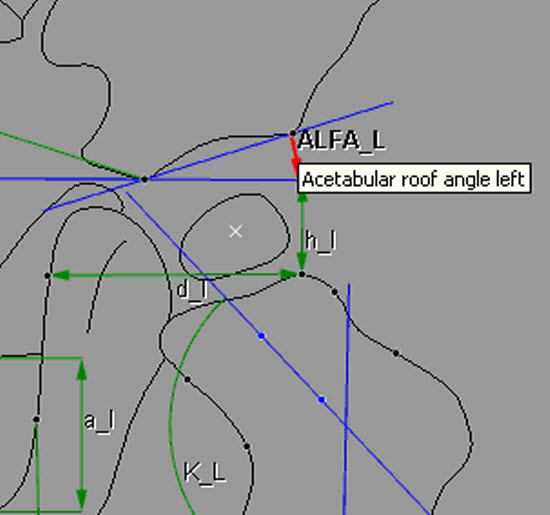
- Acetabular roof angle left:
Angle enclosed by the left acetabular roof line and the Hilgenreiner’s horizontal. (This
angle is painted automatically after finishing step 4) Result: Angle and label ARA-L.
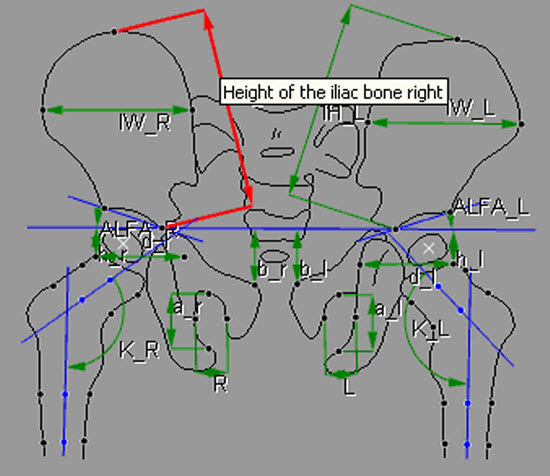
- Height of the right iliac bone:
Line specified by the topmost point of the right iliac
bone and the most caudomedial point on the right ilium. Interaction: Click 5. Result: Line between handle 5 and right handle of
Hilgenreiner’s line and label IH_R.
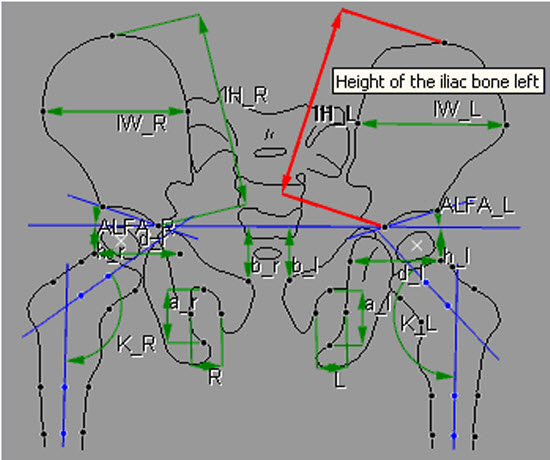
- Height of the left iliac bone:
Line specified by the topmost point of the left iliac
bone and the most caudomedial point on the left ilium. Interaction: Click 6. Result: Line between handle 6 and left handle of
Hilgenreiner’s line and label IH_L.
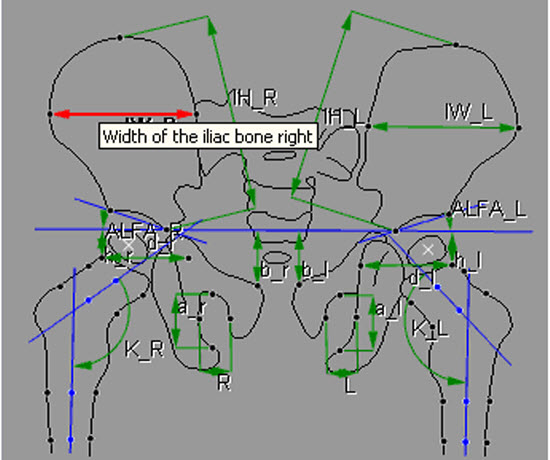
- Width of the right iliac bone:
Line specified by the most lateral point of the right iliac
bone and the most medial point of the right iliac bone on the same level.
Interaction: Click 7, Click 8. Result: Line between handle 7 and 8
and label IW_R.
- Width of the left iliac bone:
Line specified by the most lateral point of the left iliac bone
and the most medial point of the left iliac bone on the same level.
Interaction: Click 9, Click 10. Result: Line between handle 9 and
10 and label IW_L.
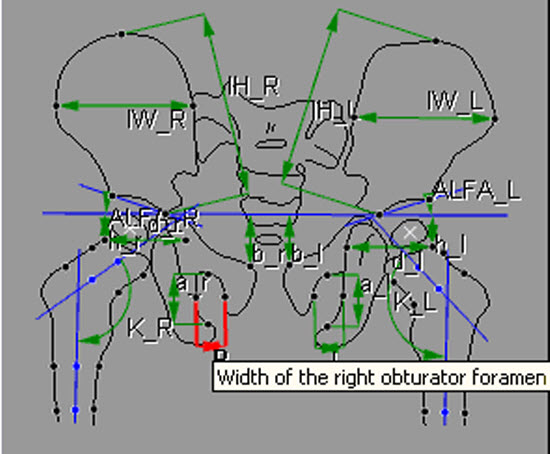
- Width of the right obturator
foramen: Line specified by the lateral and the
medial point on the right obturator foramen. Interaction: Click 11, Click 12. Result: Line between handle 11 and 12 and label ow-R.
- Width of the left obturator
foramen: Line specified by the lateral and the
medial point on the left obturator foramen. Interaction: Click 13, Click 14. Result: Line between handle 13 and 14 and label ow-L.
Additionally, the rotation index is shown (RI).

- Height of the right obturator
foramen: Line specified by the bottommost and
the topmost point on the right obturator foramen. Interaction: Click 15, Click 16. Result: Line between handle 15 and 16 and label
oh-R.
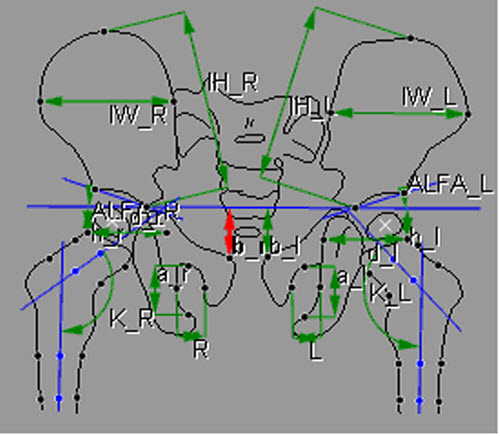
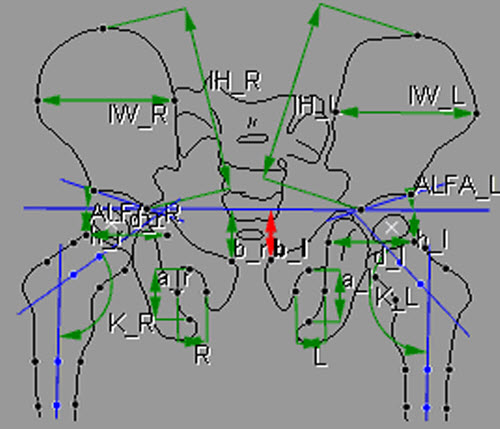
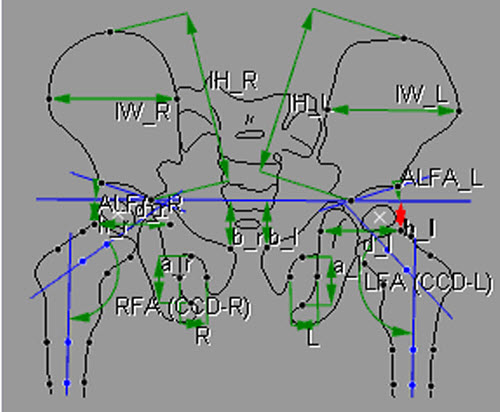
- Distance between the superior cortex of
the right pubic symphysis and the Hilgenreiner line. Interaction: Click 17. Result: Line starting from handle 17 and going
perpendicular to the Hilgenreiner’s line and label Dsphl-R. Additionally, the tilt index
right is shown (TI_R).
- Height of the left obturator
foramen: Line specified by the bottommost and
the topmost point on the left obturator foramen. Interaction: Click 18, Click 19. Result: Line between handle 18 and 19 and label
oh-L.
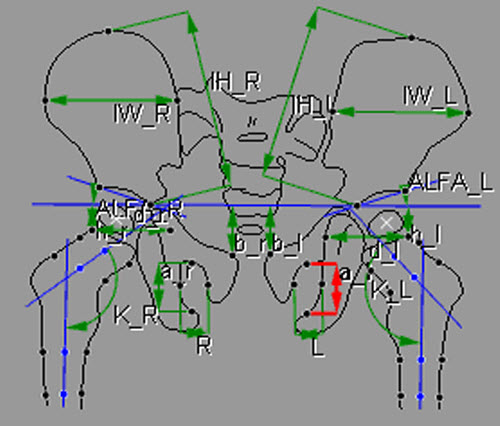
- Distance between the superior cortex of
the left pubic symphysis and the Hilgenreiner line. Interaction: Click 20. Result: Line starting from handle 20 and going
perpendicular to the Hilgenreiner’s line and label Dsphl-L. Additionally, the tilt index
left is shown (TI_L).
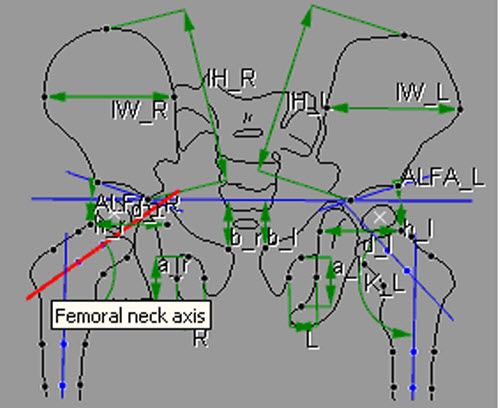
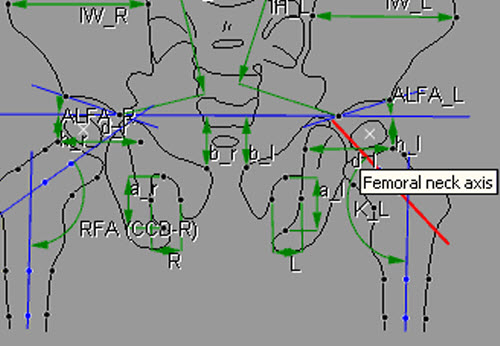
- Right femoral neck axis: Line
specified by two midpoints of juxtaposed pairs of points on
the axis of the right femoral neck. Interaction: Click
21, Click 22, Click 23, Click 24. Result: Extended line defined by the midpoint of
handle 21 and 22 and the midpoint of handle 23 and 24.
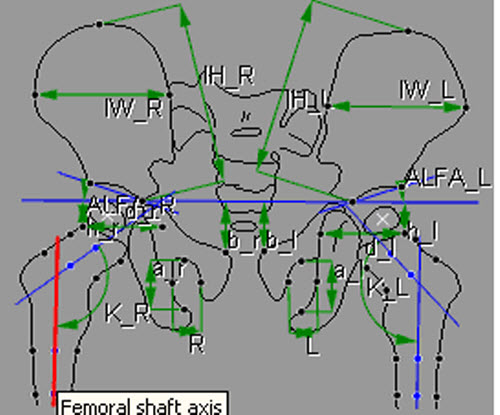
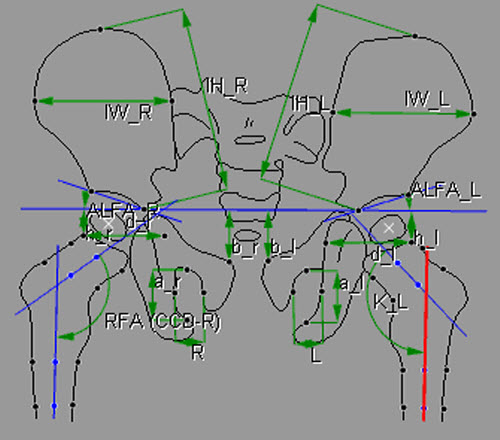
- Right femoral shaft axis: Line
specified by two midpoints of juxtaposed pairs of points on
the right femoral shaft. Interaction: Click 25, Click
26, Click 27, Click 28. Result: Extended line defined by the midpoint of handle 25
and 26 and the midpoint of handle 27 and 28.
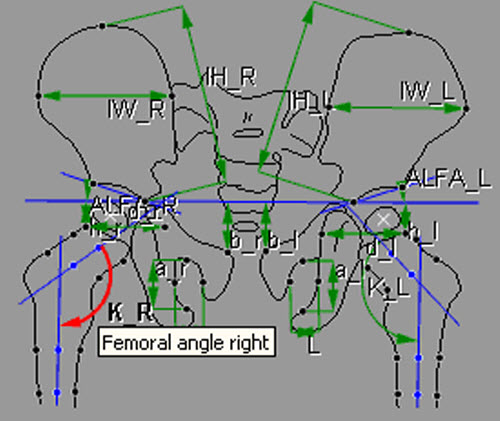
- Right femoral angle: Angle
enclosed by the right femoral neck axis and the right femoral shaft axis. (This angle is
painted automatically after finishing step 17.) Result: Angle and label RFA (CCD-R).
- Left femoral neck axis: Line
specified by two midpoints of juxtaposed pairs of points on
the axis of the left femoral neck. Interaction: Click
29, Click 30, Click 31, Click 32. Result: Extended line defined by the midpoint of
handle 29 and 30 and the midpoint of handle 31 and 32.
- Left femoral shaft axis: Line
specified by two midpoints of juxtaposed pairs of points on
the left femoral shaft. Interaction: Click 33, Click 34,
Click 35, Click 36. Result: Extended line defined by the midpoint of handle 33 and
34 and the midpoint of handle 35 and 36.
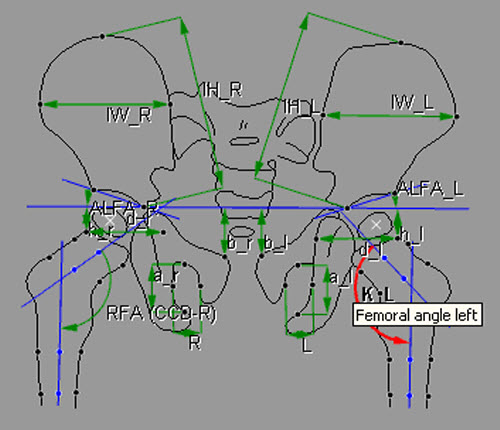
- Left femoral angle: Angle
enclosed by the left femoral neck axis and the left femoral shaft axis. (This angle is
painted automatically after finishing step 20.) Result: Angle and label LFA (CCD-L).
- Calculation line vertical
right: Line specified by the topmost point on
the right femoral neck and the vertical distance to Hilgenreiner's
horizontal. Interaction: Click 37. Result: Line starting from
handle 37 and going perpendicular to the Hilgenreiner’s line and label clv-R.
- Calculation line vertical
left: Line specified by the topmost point on the
left femoral neck and the vertical distance to Hilgenreiner's horizontal.
Interaction: Click 38. Result: Line starting from handle 38 and
going perpendicular to the Hilgenreiner’s line and label clv-L.
- Calculation line horizontal
right: Line specified by the topmost point on the right femoral neck and a
reference point on the ischium. Interaction: Click 39. Result: Line defined by handle 39 and handle 37 and label
clh-R.
- Calculation line horizontal
left: Line specified by the topmost point on the left femoral neck and a
reference point on the ischium. Interaction: Click 40. Result: Line defined by handle 40 and handle 38 and label
clh-L.